


After an amputation, one of the most important parts of recovery is managing the shape and size of your residual limb. Swelling is a natural response after surgery, but if it’s not handled properly, it can slow down healing and make it harder to fit into a prosthesis later. That’s why compression wrapping plays such a big role in this phase of rehabilitation.
When done the right way, compression wrapping helps reduce swelling, supports blood flow, protects delicate skin, and gently guides the limb into a shape that will work better with a prosthetic socket. It’s not just a medical step — it’s part of shaping your future mobility.
Why Compression Wrapping Matters in Limb Recovery
Understanding the Purpose of Compression
After an amputation, the body goes through many changes — both inside and outside. One of the most common and natural responses is swelling, known as post-surgical edema.
It happens because your body is sending blood and healing cells to the area, trying to repair and adjust after the trauma of surgery.
But while some swelling is normal, too much of it for too long can slow healing. It can stretch the skin, increase pain, and delay when you can start using a prosthesis. That’s where compression wrapping comes in.
Compression helps manage this swelling by applying gentle, steady pressure to the residual limb. This pressure keeps fluid from building up and encourages the body to move excess fluid out through normal circulation.
When used regularly, wrapping also helps your limb take on a smoother, more uniform shape — which is critical for prosthetic fitting later.
In short, compression wrapping is not just a comfort tool — it’s a medical step that supports healing, protects the limb, and prepares you for the next stages of mobility.
Shaping the Limb for Prosthetic Fitting
One of the long-term goals after amputation is to wear a prosthesis comfortably and confidently. For that to happen, your residual limb needs to be shaped in a certain way.
Ideally, it should be slightly tapered — meaning it’s a little wider at the top and narrower at the bottom. This shape allows the prosthetic socket to grip securely without causing pressure points or gaps.
When the limb is swollen, uneven, or still soft, it’s difficult to get a good fit. A poorly shaped limb can lead to prosthetic problems later, like rubbing, skin irritation, or even injury.
Compression wrapping helps guide the healing limb into the right shape by applying more pressure at certain points and less at others. Over time, this shapes the tissue gently and naturally.
Think of it as guiding clay into a mold — not with force, but with steady, careful pressure that allows it to settle into the form it needs to take.
Supporting Skin Health and Reducing Sensitivity
After amputation, the skin on your residual limb can be sensitive. It’s adjusting to new pressure, new sensations, and the changes brought on by healing.
If left uncovered, this skin can dry out, crack, or become irritated — especially in hot or dusty climates. Compression wrapping provides a layer of protection.
It shields the limb from contact with rough fabrics or surfaces. It also helps keep moisture in, which supports the skin’s natural barrier.
Some people also experience hypersensitivity after surgery. Even a light touch can feel uncomfortable. Wrapping the limb regularly helps desensitize the skin over time.
The gentle pressure from the bandage trains the nerves to get used to contact again. This process is slow but very important for future prosthetic use.
A limb that is desensitized and conditioned by compression is easier to manage when it’s time to wear a socket for hours every day.
Building Confidence Through Routine
There’s something else compression wrapping helps with — confidence. When you first come home after surgery, everything can feel unfamiliar.
You may not feel in control of your body, your schedule, or even your healing process. But learning to wrap your limb — and doing it regularly — gives you something powerful: a daily habit that supports your recovery.
At first, wrapping might feel awkward. It might take time to learn the angles, the tension, and how to secure it properly.
But with practice, it becomes easier. And with that ease comes a sense of control. You begin to feel more connected to your body again. You feel like you’re doing something meaningful for your healing — because you are.
This sense of ownership over your recovery can improve your mindset. You’re not just waiting for healing to happen. You’re actively shaping it — with your own two hands.
When to Start Compression Wrapping
The timing of when to begin compression wrapping depends on your specific surgery, how well the wound is healing, and what your doctor advises.
In most cases, wrapping starts after the stitches are removed or once the wound is closed and dry. This is usually within 10 to 14 days after surgery, but it can vary.
Your medical team will let you know when it’s safe to begin. It’s very important not to start wrapping too early. If the wound is still open or leaking fluid, wrapping can trap bacteria and lead to infection.
But once the area is healed enough, wrapping becomes a daily part of your recovery plan.
In the beginning, you might have a therapist or nurse show you how to wrap. This is a great opportunity to ask questions, try it yourself, and make sure you’re doing it correctly.
After a few days, most patients are able to manage it on their own.
Mastering the Art of Compression Wrapping: Technique, Tips, and Avoiding Mistakes
Getting Started: What You Need Before You Begin
Before wrapping your limb, you’ll need a clean, dry surface to work on and a compression bandage that’s right for your size and type of amputation.
Most patients use elastic bandages like ACE wraps or special medical compression wraps recommended by their therapist. The material should stretch well but also return to its shape easily.
You also need clean skin. Gently wash your residual limb with warm water and mild soap. Pat it dry with a soft towel.
Make sure the skin is completely dry before wrapping. Moisture can get trapped under the wrap and cause irritation or even skin infections.
Positioning is important too. Sit in a way that gives you a clear view of your limb and enough room to move your hands freely.
If you’re wrapping a lower limb, try sitting on a chair with your leg supported on a stool. If you’re wrapping an upper limb, use a table to rest your arm comfortably.
Take a few deep breaths and go slowly. Rushing the process can lead to uneven pressure or missed areas.
How to Wrap: The Basic Technique That Works
Wrapping should always begin at the end of the limb and work upward. For example, if you’ve had a below-the-knee amputation, start wrapping at the bottom of the limb (the part furthest from your knee) and move up toward the thigh.
The pressure should be firm but not tight. You’re aiming for steady compression — not a squeeze. Think of it like hugging the limb with the bandage, not strangling it. You should feel supported, not uncomfortable.
As you move upward, use diagonal turns rather than horizontal circles. This means wrapping in a figure-eight pattern rather than just going straight around. This pattern helps avoid cutting off circulation and creates an even, tapered shape.
Each new layer of the bandage should overlap the previous one by about half its width. This ensures there are no gaps where fluid can build up or pressure can be uneven.
Keep the wrap smooth. If you see wrinkles or feel bumps under the wrap, remove it and start again. Even small folds can press into the skin over time and cause damage.
Once you’ve reached the top of the limb, secure the bandage with clips, tape, or Velcro straps. Avoid using pins or anything that might dig into your skin if the wrap shifts.
When finished, the wrap should feel snug and supportive, but you should still be able to wiggle your fingers or toes slightly if the limb allows.
If the wrap feels too tight or if you notice tingling, numbness, or a change in skin color, take it off and rewrap it with less tension.
Common Mistakes That Can Affect Healing
One of the most common mistakes is wrapping too tightly. While it might feel like tighter means better support, it can actually block circulation and increase pain or swelling.
If your limb feels cold, turns pale or bluish, or becomes numb, the wrap is too tight.
Another mistake is inconsistent wrapping — doing it differently each time or skipping days. The key to effective compression is consistency.
When done daily, the limb maintains its shape, and swelling stays under control. But skipping wraps or doing them too loosely means the limb can swell again, undoing progress and making it harder to fit a prosthesis later.
Improper wrapping technique — like using straight, horizontal wraps instead of diagonal or figure-eight patterns — can also cause what’s called “tourniquet effect.”
This happens when a section of the wrap presses into the limb unevenly, leading to discomfort and pressure sores. Always take your time and double-check your wrap before moving on with your day.
And don’t forget hygiene. Reusing a soiled or damp bandage can introduce bacteria and irritate the skin. Make sure your wraps are clean and dry before each use.
Wash them regularly according to the instructions, and replace them if they become worn out.
Building a Wrapping Routine That Fits Into Daily Life
Consistency is easier when you have a simple routine. Try wrapping your limb at the same times every day — once in the morning and again in the evening, if advised.
You can tie it into other habits, like brushing your teeth or finishing breakfast, to make it part of your natural rhythm.
Some people find it helpful to set reminders on their phone or keep their wrapping materials in a visible place, like next to their bed or on a bathroom shelf.
The easier it is to access your supplies, the more likely you are to keep up with it.
In hot weather, you may need to adjust your routine slightly. Sweating can make the wrap feel uncomfortable or cause it to slip.
In these cases, use breathable bandages and monitor your skin more closely. If needed, unwrap the limb briefly during the day to clean and dry the skin, then rewrap.
If you’re traveling or spending time outside your regular schedule, bring extra wraps with you. Make sure you always have a clean one ready so you’re not forced to skip a session.
Learning to wrap well takes practice, but most people get the hang of it within a week or two. If you’re struggling, don’t be afraid to ask your therapist or prosthetist to review your technique.
Sometimes a small tip or adjustment makes all the difference.
Wrapping as a Moment of Self-Care
Compression wrapping isn’t just a medical task. Over time, many patients come to see it as a moment of self-care. It’s a time to check in with your body, see how your limb is healing, and take pride in being part of your own recovery.
It gives you something you can do — actively — to shape your future and support your journey toward independence.
And that’s powerful.
Adapting Compression Wrapping to Different Amputation Types
Wrapping After a Below-the-Knee Amputation (Transtibial)
For individuals with a below-the-knee amputation, wrapping focuses on shaping the lower part of the leg and preventing swelling in the calf and knee region.
The goal is to create a smooth, conical shape — wide at the top and narrower toward the bottom — that allows the future prosthesis to fit securely and comfortably.
In this type of wrapping, you begin at the bottom of the residual limb and move diagonally upward toward the knee, making sure to avoid tight circles that can cause a tourniquet effect just below the joint.
The knee should be wrapped, too, unless your doctor says otherwise. Wrapping over the knee can help prevent stiffness, keep the joint mobile, and maintain proper blood flow.
It’s common to use a long bandage — usually four to six inches wide — for this wrapping. The bandage should cross over the front and back of the limb in a figure-eight pattern, creating even pressure throughout.
Avoid any gaps, especially behind the knee, where swelling can collect if the bandage is too loose.
Consistency is key here. A well-wrapped below-the-knee limb will feel supported but not restricted. With daily wrapping, you’ll start to see a noticeable change in shape within the first couple of weeks.
Wrapping After an Above-the-Knee Amputation (Transfemoral)
Wrapping a limb after an above-the-knee amputation requires slightly different handling. The residual limb is often softer, and the tissue near the hip and thigh may retain fluid for longer.
There’s also more muscle mass in the thigh area, which means swelling can be deeper and more persistent.
The goal here is also to shape the limb for future prosthetic use, but wrapping needs to cover a larger surface area and stay in place even with more movement at the hip.
In this case, you’ll start wrapping just above the end of the residual limb and move upward toward the hip. Use broad, overlapping diagonal turns, and always maintain pressure from the bottom upward.
Never begin wrapping from the top of the limb down — doing so can trap fluid and cause discomfort.
Securing the wrap in place is particularly important with above-the-knee amputations. Since the thigh moves more throughout the day, a loosely wrapped bandage can slip down.
To prevent this, use a wider bandage and secure it higher up the thigh using gentle tape or a soft support belt.
Patients often feel frustrated when wraps come undone during walking or sitting. If this happens regularly, talk to your therapist about using a shrinker or compression garment as an alternative, once the wound is fully healed.
Wrapping for Upper Limb Amputations
Upper limb amputations, such as below-the-elbow or above-the-elbow, also require careful and consistent compression.
Since the arm has many small muscles and is used frequently during daily activities, swelling can be difficult to control without proper wrapping.
For below-the-elbow amputations, the wrap should begin at the end of the residual limb and continue upward past the elbow.
Crossing the elbow joint helps maintain range of motion and ensures a consistent shape throughout the forearm. As with the leg, use a diagonal or spiral technique, overlapping the bandage by half with each pass.
Avoid wrapping directly over the bony part of the elbow with too much pressure — this can lead to soreness or skin breakdown.
Above-the-elbow amputations involve the upper arm and shoulder. In this case, wrapping needs to account for shoulder movement and should be anchored in a way that won’t slip with arm motions.
Wrapping can be secured by gently tying around the shoulder, almost like a sling, without cutting off movement or circulation.
Upper limb wrapping can feel more complex due to frequent motion in the arms and the shape of the joints, but with patience and repetition, it becomes manageable.
Patients often say they find it helpful to practice in front of a mirror to ensure even wrapping and correct alignment.
Wrapping for Irregular or Bulbous Limb Shapes
Some residual limbs develop irregular or bulbous shapes due to the way soft tissue heals. These areas may include extra swelling at the tip, pockets of fluid, or uneven curves that don’t follow the usual taper.
For these limbs, standard wrapping may not work as well. That’s where wrapping technique becomes even more important.
The main focus in these cases is to guide the soft tissue gently into a smoother form.
To do this, use slightly firmer pressure around the swollen or wide areas, while keeping the rest of the wrap comfortably snug. Never over-tighten — the idea is to guide, not force.
Instead of one large bandage, some therapists recommend using two shorter ones. This allows you to control pressure in smaller zones, especially when dealing with tough-to-wrap areas like a bulbous lower limb tip or a curved upper arm.
In some cases, special padding may be used underneath the bandage to help apply extra support to one area while cushioning another.
Your prosthetist or therapist can help you plan the right strategy based on your limb shape.
Recognizing When the Wrap Isn’t Working
No matter the type of amputation, you should pay attention to how your limb looks and feels after wrapping.
If swelling gets worse instead of better, or if the limb feels numb, tingly, or cold, the wrap may not be doing its job. It may be too loose, too tight, or uneven.
Also, watch for skin changes. If the skin becomes red, blistered, or sore, stop wrapping and speak to your medical provider right away.
Wrapping should never cause pain. Discomfort usually means something needs to be adjusted.
Keep track of changes in limb size and shape over time. You can use a flexible measuring tape and note the measurements once or twice a week.
This helps you stay aware of your progress and gives your care team valuable information about your healing.

Moving from Wrapping to Shrinkers: Timing, Technique, and Long-Term Shaping
When Wrapping Is No Longer Enough
In the early weeks after amputation, compression wrapping is the first and most accessible tool for managing swelling. It allows you to control pressure manually and adjust tension based on how your limb feels each day.
But as your limb begins to stabilize and the swelling reduces, you may find that bandages don’t fit as well as they once did. They may slip more easily or stop providing the firm, even compression your limb needs.
This is a sign that your recovery is moving to the next stage.
As healing progresses, most patients transition from wrapping to shrinkers — specially made elastic garments that offer consistent compression and help continue the shaping process.
Shrinkers are more convenient, easier to apply, and ideal for maintaining the results you’ve already achieved through careful wrapping.
However, this transition doesn’t happen on a fixed date. The right time varies for each person and depends on a few important factors: your skin condition, your wound healing, your limb’s shape, and your doctor’s or prosthetist’s advice.
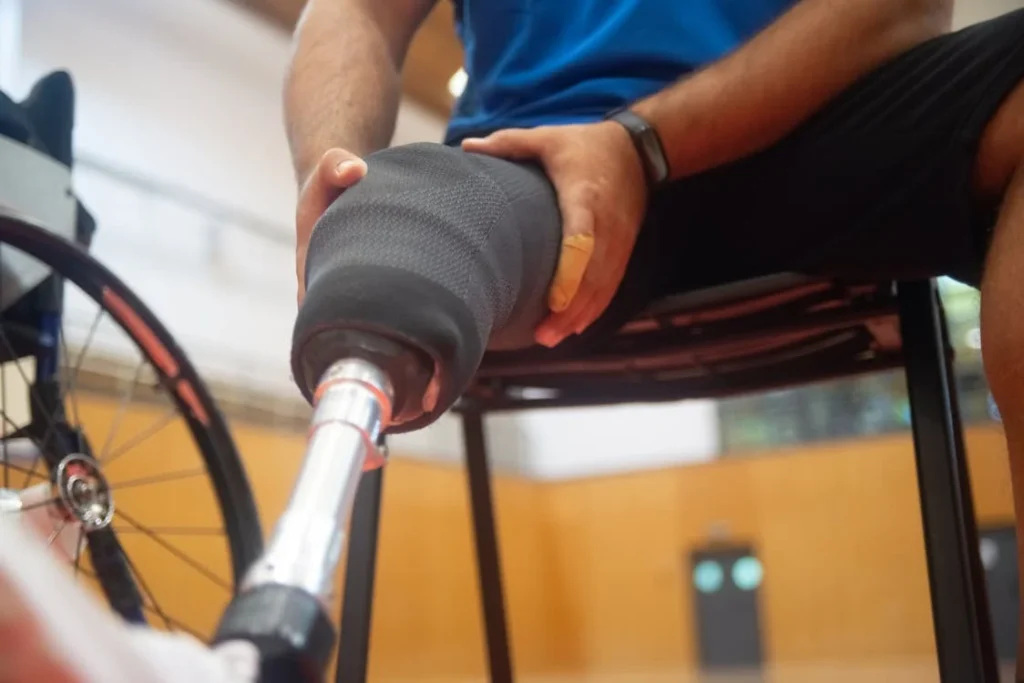
What Are Shrinkers and How Do They Work?
A shrinker looks like a tight sleeve or sock made from stretchable, breathable fabric. It slides over your residual limb and gently squeezes it to help prevent fluid buildup.
Unlike wraps, which you apply manually, shrinkers offer uniform compression that stays in place all day — even with movement.
This steady pressure helps guide your limb into a smoother, more tapered shape. It also reduces the chance of irregular swelling that can throw off your prosthetic fitting.
Most shrinkers come in different sizes and strengths, and your prosthetist will help you choose one based on how your limb is healing.
Some shrinkers are simple pull-on garments, while others come with straps or velcro closures to adjust the fit. Some are designed for above-the-knee limbs, others for below-the-knee or upper limb use. T
here are even shrinkers with padded ends to protect tender skin at the tip of the limb.
The key benefit is simplicity. Once you’re used to wearing a shrinker, it becomes part of your daily routine — just like brushing your teeth or getting dressed.
Making the Switch: How to Transition from Wrapping to Shrinker Use
Transitioning from wraps to shrinkers isn’t something to do on your own. Your care team — especially your prosthetist or physical therapist — will assess whether your limb is ready.
If your wound has fully closed, the swelling has reduced significantly, and your limb has started forming a stable shape, you may be cleared to begin using a shrinker.
In some cases, your team might suggest starting with a few hours per day, then gradually increasing the time.
This helps your skin adjust to the consistent pressure. You’ll still need to inspect your limb daily for any signs of irritation, redness, or pressure marks.
Some patients continue wrapping at night and wear shrinkers during the day in the beginning. Others use the shrinker full-time and stop wrapping altogether.
It depends on how your limb responds, how comfortable the shrinker feels, and what your therapist advises.
It’s important to note that shrinkers are not one-size-fits-all. If the shrinker feels too tight, cuts into your skin, or causes numbness or discomfort, stop using it and get re-fitted.
A well-fitted shrinker should feel snug but not painful. You should be able to move, sit, and walk without feeling restricted.
Caring for Your Shrinker
Because shrinkers are worn against the skin, they absorb sweat, oils, and skin particles throughout the day. This makes it essential to keep them clean.
Most shrinkers can be hand-washed or machine-washed on a gentle cycle, then air-dried. Avoid using hot water or harsh detergents — these can damage the fabric and reduce its elasticity.
Have at least two shrinkers so you can alternate between them. This gives each one time to dry and recover its shape after washing.
Over time, even the best-made shrinker will stretch out and lose effectiveness. Check the fit regularly, and replace your shrinker if it feels loose or starts slipping.
Keeping your skin clean and dry under the shrinker is also important. After removing the garment, gently wash your limb with warm water and mild soap.
Pat it dry before putting the shrinker back on. If you apply lotion to the skin, let it absorb fully to avoid buildup under the fabric.
Shrinkers and Prosthetic Readiness
Shrinkers are more than just a replacement for wraps — they’re a direct step toward being ready for a prosthetic.
When worn daily and maintained properly, they help create a stable limb volume that makes prosthetic fitting more accurate and comfortable.
Without this consistent shaping, your limb may still change size frequently, causing your prosthetic socket to feel loose one day and tight the next.
A well-shaped limb means fewer adjustments, fewer pressure points, and a smoother transition to prosthetic walking.
Your prosthetist will typically measure your limb for socket design once shrinker use has stabilized your shape.
Some patients may still use the shrinker at night even after getting a prosthetic, especially in the early stages. Others continue using it between prosthetic wear or after long periods of activity to manage swelling.
Shrinkers aren’t a replacement for care — they’re a tool to support your hard work. Wrapping lays the foundation. Shrinkers help you build on it.
Long-Term Shaping Success: Staying Consistent and Knowing What to Watch For
Monitoring Changes in Your Limb Over Time
Even after your wound has healed and your limb shape has stabilized, your residual limb will continue to change — sometimes in small ways, sometimes noticeably.
It might respond to your daily activity, your body weight, or even changes in weather. Swelling may come and go. Muscle tone may shift. Skin condition may fluctuate.
That’s why limb care doesn’t stop when you get your prosthesis. It becomes a part of your everyday health routine.
Compression — whether through shrinkers, socks, or even occasional wrapping — continues to play a role in managing these subtle changes.
Many prosthetic users find that swelling increases after long walks or standing for long hours. Others notice that their limb feels larger in the evening than in the morning.
By using compression tools consistently, you can manage these variations and avoid socket discomfort or skin damage.
Check your limb regularly. Look for new marks, spots of redness, or small wounds that don’t heal. These can be signs of uneven pressure or a need to adjust your compression strategy.
Don’t ignore discomfort — it’s your body telling you something has changed.
Knowing When to Ask for Help
Sometimes, despite doing everything right, issues still come up. Your shrinker might start slipping. Your residual limb might begin to swell again.
Or the shape might seem less tapered than before. This doesn’t mean you’ve failed — it just means your limb is changing, and it’s time to reassess your plan.
If you notice significant changes in shape, discomfort while wearing your prosthesis, or repeated skin irritation, reach out to your prosthetist or therapist.
They can evaluate your compression method, suggest a different size or type of shrinker, or recommend a short return to wrapping if needed.
Don’t wait until a small problem becomes a major setback. The sooner you adjust, the easier it is to stay on track with your mobility goals.
At Robobionics, we always encourage open communication. Our team regularly checks in with patients not just about their prosthetic fit, but about compression habits, skin condition, and daily comfort. Long-term success depends on this kind of honest, ongoing conversation.
Making Compression a Natural Part of Life
At first, compression wrapping and shrinker use can feel like extra work. Something to remember. Something you have to make time for. But over time, with repetition and purpose, it becomes a part of life — as routine as dressing or brushing your teeth.
The best way to build this habit is to connect it to something meaningful. Remember why you’re doing it: not just to reduce swelling, but to shape your future.
Every wrap, every day of shrinker use, brings you one step closer to better comfort, better mobility, and more freedom in your movement.
Give yourself credit for the effort you put in. Recovery is not easy. But every act of care — no matter how small — adds up. And that’s something worth recognizing.
At Robobionics, we’ve seen patients go from being overwhelmed by wrapping to mastering it with ease. We’ve watched people use shrinkers not just as a tool, but as a sign of progress.
And we’ve seen how small, steady habits lead to powerful, lasting outcomes.
You don’t need to be perfect. You just need to stay consistent.
Conclusion
Compression wrapping and shaping are more than just steps in recovery — they are the groundwork for everything that comes next. From the moment swelling begins to the day you take your first confident steps with a prosthesis, how you manage your limb shape plays a vital role in how comfortable, capable, and mobile you become.
Learning to wrap your limb correctly, knowing when to switch to shrinkers, and keeping up with daily care — these are not just technical skills. They are acts of empowerment. They allow you to take control of your recovery, shape your own progress, and walk into your future with strength.
At Robobionics, we believe that healing happens one small action at a time. And compression is one of those actions that, done right, transforms your comfort, your confidence, and your quality of life.
Stay steady. Stay kind to your body. And keep moving forward — one wrap, one day, one step at a time.