
Post-Op Follow-Up Schedule That Prevents Prosthetic Delays (For Clinicians)
For many clinicians, the surgery is only the first step. What happens after the operation


Losing a limb changes life in many ways—physically, emotionally, and mentally. It’s not just about learning to move differently; it’s about rebuilding confidence, comfort, and control. For someone waiting to receive their first prosthetic limb, this waiting period can feel long and uncertain. But it’s also a powerful time to prepare the body and mind for what’s next.
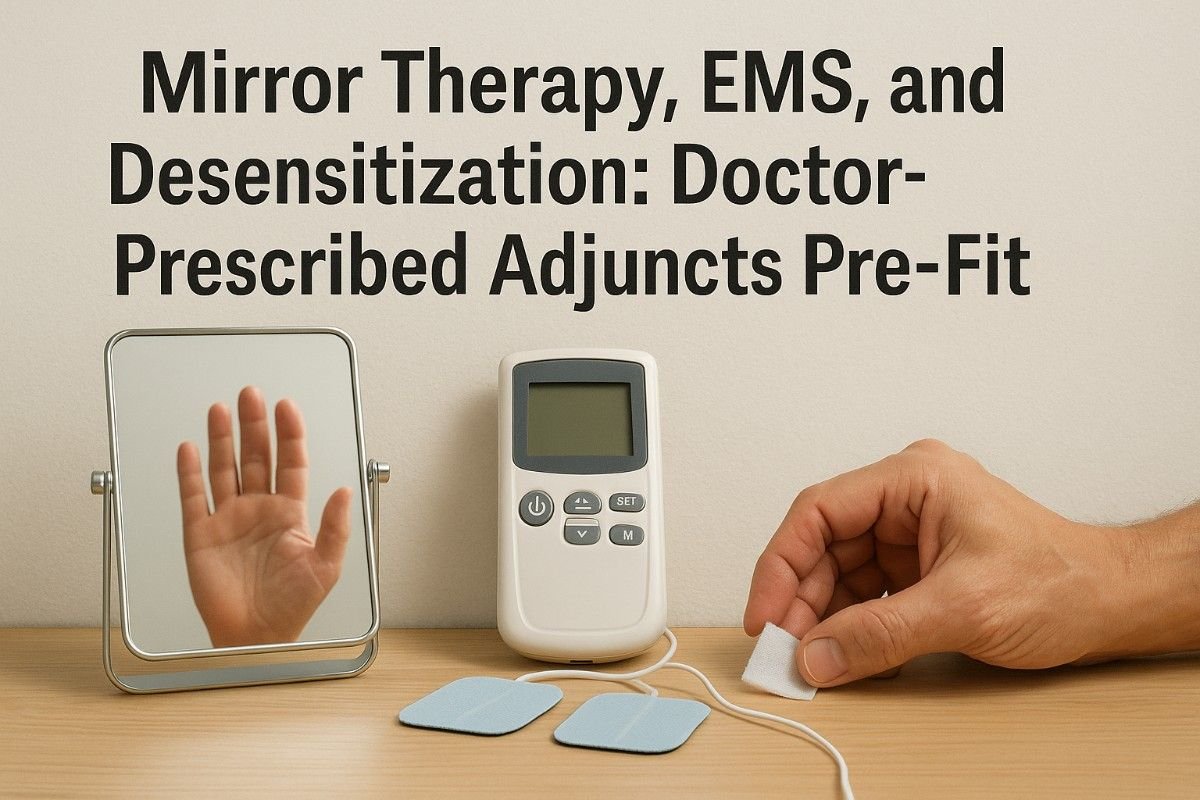
That’s where doctor-prescribed pre-fit therapies come in. These are special exercises and treatments designed to help your body get ready for a prosthetic. They strengthen your muscles, reduce pain, and help your brain adapt faster once the prosthesis is fitted. Among the most common and effective therapies are Mirror Therapy, Electrical Muscle Stimulation (EMS), and Desensitization Therapy.
Think of them as your early partners in healing. They don’t replace the prosthesis—they prepare you for it. Each one has a specific purpose: Mirror Therapy helps retrain the brain, EMS keeps your muscles active, and Desensitization prepares your skin and nerves to handle new sensations.
In this guide, we’ll walk you through how each of these therapies works, why doctors recommend them before a prosthetic fitting, and how they make the fitting process smoother and more successful. Whether you’re a patient, a caregiver, or a medical professional, you’ll find clear steps, real-life insights, and actionable advice to help make the journey toward prosthetic use easier and more effective.
Let’s begin with one of the simplest yet most fascinating techniques—Mirror Therapy.
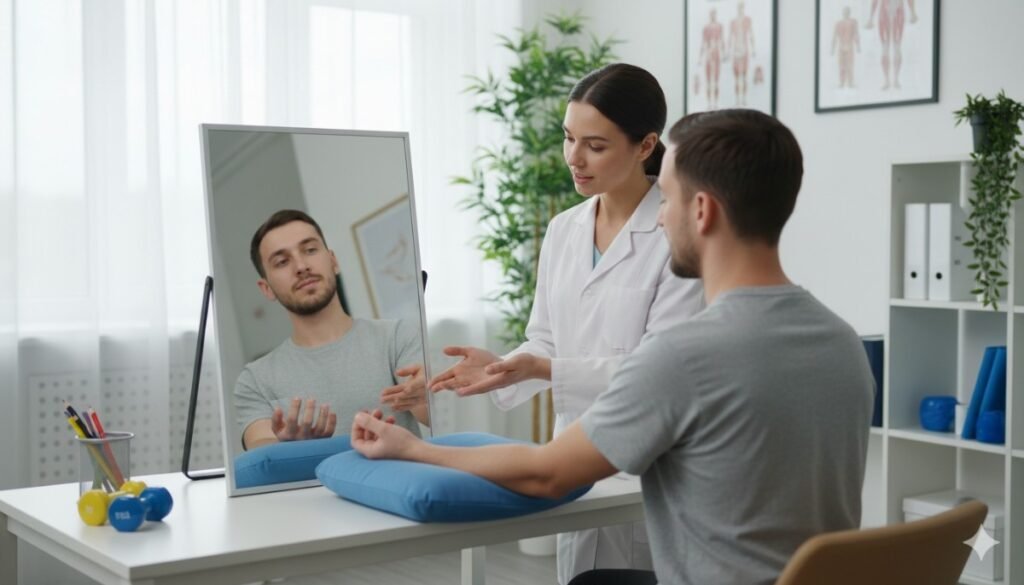
Mirror Therapy might sound simple, but it’s one of the most powerful tools for brain retraining after limb loss. It uses a mirror to create the illusion that the missing limb is still there. When you move your existing hand and see its reflection, your brain gets visual feedback that the other limb is moving too.
This simple visual trick can help reduce phantom limb pain—a common issue where people feel pain or itching in a limb that’s no longer there. Over time, the brain starts to reconnect and adapt to the new body image. It learns that the limb is gone, and the painful or confusing signals start to calm down.
Before getting a prosthetic, your brain needs to build new pathways that support balance, coordination, and confidence. Mirror Therapy helps with that. It’s not just about pain relief—it’s about helping your brain and body work together again.
Doctors often prescribe this therapy during the pre-fit phase because it keeps the nervous system active. It helps reduce the emotional frustration that comes from phantom sensations and prepares the user to accept visual and sensory feedback once they begin using a bionic or mechanical limb.
You don’t need a fancy setup. A simple mirror and a calm space are enough.
Start with 5–10 minutes a day, and gradually increase to 20 minutes. The key is consistency. Even short, daily sessions help the brain build stronger, clearer connections.
Many people rush through mirror sessions or lose focus during the exercise. This reduces its effect. You must be calm, focused, and patient. Avoid multitasking or talking during your session.
Another mistake is starting too soon after surgery, before the wound has healed or swelling has reduced. Always check with your doctor or therapist to confirm the right time to begin.
Mirror Therapy is not only physical—it’s emotional healing too. When you “see” your hand again, it gives a sense of wholeness that many people deeply miss. It helps ease anxiety and frustration and restores a feeling of control over your body.
For many, this therapy also becomes a quiet moment of mindfulness. It’s a space to reconnect with yourself and rebuild confidence before taking the next step toward prosthetic fitting.
When the time comes to fit a prosthetic, patients who have practiced Mirror Therapy often adjust faster. Their brain already understands how to visualize two active limbs, which makes myoelectric control and muscle coordination easier to learn.
This means fewer training sessions, better comfort, and faster adaptation. The brain doesn’t resist the prosthesis—it welcomes it as part of the body’s new reality.
While Mirror Therapy is generally safe, it’s not suitable for everyone. If you have severe phantom pain that worsens during the session, visual discomfort, or psychological distress, stop immediately and talk to your rehabilitation specialist.
Some patients may need to start with guided sessions under a physiotherapist before doing it independently.
If you are supporting someone going through Mirror Therapy, your role matters. Help them set up the mirror correctly, keep a calm environment, and encourage them when they get frustrated. Progress can be slow, but steady practice makes a big difference.
Caregivers can also help track improvement. Note how often the pain occurs and how it changes over time. Small signs—like reduced itching, better mood, or improved sleep—often show that the therapy is working.
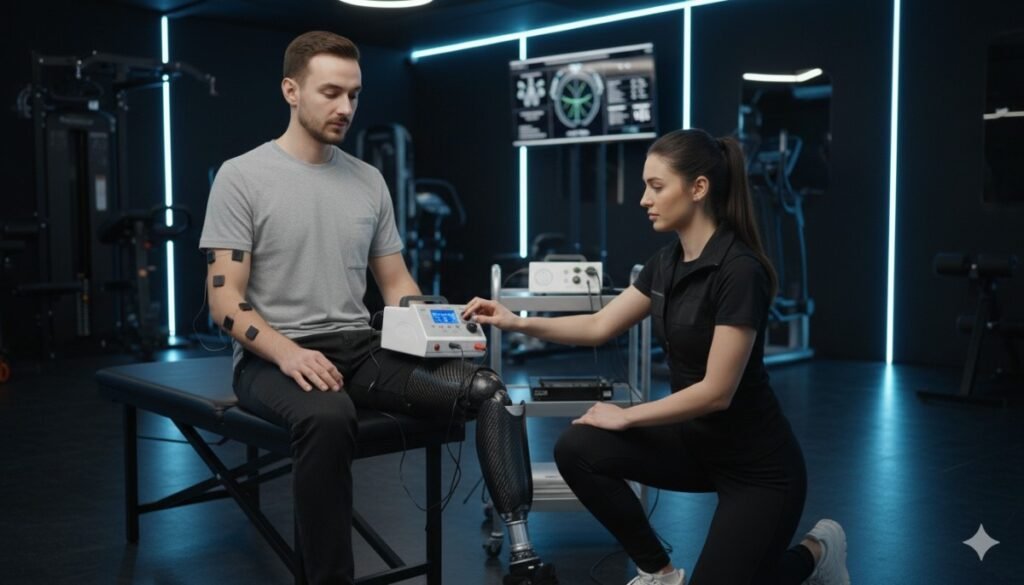
Electrical Muscle Stimulation, or EMS, is another doctor-recommended therapy before prosthetic use. It involves sending mild electrical pulses through the muscles to make them contract. These signals mimic the brain’s natural messages that cause muscles to move.
For someone with an amputation, EMS is vital because it keeps the residual muscles active. After limb loss, muscles can weaken quickly due to lack of use. EMS helps prevent that. It strengthens the muscles that will later control the prosthesis, especially in myoelectric hands like Grippy™.
When electrodes are placed on your skin, they deliver small electrical impulses that cause the muscles to tighten and relax. This movement increases blood flow, prevents stiffness, and maintains muscle tone.
Over time, it helps the body stay ready for the day when real, voluntary signals from your remaining muscles will control your prosthetic device.
EMS offers several physical and psychological benefits. It keeps your muscles healthy, reduces swelling, and improves circulation. It can also help reduce phantom pain by providing controlled sensory input to the affected area.
Emotionally, many patients feel more in control of their recovery when they actively use EMS. It’s empowering to see the muscles working again and know that progress is happening.
Before starting EMS, it’s essential to consult your doctor or rehabilitation specialist. They will guide you on where to place the electrodes and how strong the stimulation should be.
Start with low-intensity sessions, around 10–15 minutes a day, and gradually increase the duration as your body adapts. Always use clean skin and properly attached electrodes to prevent irritation.
Do not use EMS directly on open wounds, over infected areas, or if you have a pacemaker or heart condition.
During the first few sessions, you might feel a tingling or mild pulsing sensation. It should never be painful. Your muscles may twitch or contract lightly, which is a good sign—it means the therapy is working.
After a week or two, you may start to notice improved muscle firmness and better control of voluntary contractions. These small improvements build up, helping you prepare for prosthetic training.
While EMS is powerful on its own, pairing it with light physical exercises can enhance results. Try simple stretching, gentle resistance work, or even basic core stability exercises alongside EMS. This combination helps improve both muscle strength and coordination.
Your physiotherapist can design a plan that suits your comfort and progress level.
For advanced prosthetic hands like Grippy™, EMS plays a huge role. These devices read electrical signals from your muscles to control movement. The stronger and clearer your muscle signals are, the better the prosthesis responds.
Practicing with EMS before fitting ensures that your muscle groups are healthy, responsive, and ready for training. It’s like tuning an instrument before you start playing—it makes everything smoother and more precise.
One of the biggest mistakes is overusing EMS. Too many sessions or high-intensity pulses can cause fatigue or discomfort. The goal is steady improvement, not overexertion.
Another issue is incorrect electrode placement. Always follow your therapist’s guidance and check the diagrams provided with your EMS device. Incorrect placement can make the therapy ineffective or uncomfortable.
The biggest secret to success with EMS is consistency. Just like regular workouts, muscles respond best when stimulated regularly. A few minutes a day is far better than one long session once a week.
Think of EMS like a gentle reminder to your muscles that they still have a job to do. Each pulse helps your brain and body stay connected, reducing the “forgetting” that often happens when muscles remain inactive after surgery.
Over time, this routine helps create muscle memory. When your prosthesis arrives, your body already knows what to do—making training smoother and faster.
Many doctors recommend combining EMS with active physiotherapy sessions. The reason is simple: EMS keeps the muscles strong, while physiotherapy teaches coordination and range of motion.
For example, your therapist might use EMS on your forearm muscles while guiding you through gentle gripping motions. This reinforces the natural connection between muscle activity and functional movement.
When these two therapies work together, they help you regain both strength and control.
Every muscle in your body communicates through electrical signals. After amputation, some of these signals weaken because they no longer have the same path to travel. EMS acts like a translator—it helps the brain “hear” those muscles again.
By using mild electrical impulses in specific patterns, EMS helps strengthen your remaining muscle fibers and refine the brain’s ability to recognize and control them. This becomes especially useful during the fitting of myoelectric prostheses, where muscle signals drive hand movements.
Progress with EMS is often subtle at first. You may notice that the muscles twitch more smoothly, or that your skin becomes less sensitive to stimulation. These are good signs—your body is adjusting.
As weeks go by, you’ll likely see clearer muscle definition and faster reactions. Even small milestones like a firmer contraction or better control mean that your muscles are learning.
Remember, EMS isn’t about speed—it’s about long-term readiness.
Many patients find it helpful to set small goals for each week. It might be increasing the session length by two minutes or improving electrode placement accuracy. Celebrate every bit of progress.
Maintaining a calm mindset during EMS sessions also matters. Focus on your breathing, visualize the muscle movement, and stay present. These mental habits improve body awareness, making future prosthetic control more intuitive.
As your muscles get stronger, your therapist may suggest increasing intensity or session duration. This should always be gradual. Pushing too hard can cause fatigue or mild soreness.
Ideally, you should feel a gentle, rhythmic pulsing that encourages contraction without pain. The goal is stimulation, not strain.
Most rehabilitation specialists recommend starting with 3–4 sessions per week, then adjusting based on comfort and recovery speed.
RoboBionics’ BrawnBand is a type of advanced electronic muscle stimulator designed to support pre-fit conditioning. It offers safe, customizable settings that help users strengthen their residual muscles in a controlled way.
It can be especially useful for patients waiting for a Grippy™ Bionic Hand, as it helps prepare the exact muscles that will later send control signals to the prosthesis.
By practicing with tools like BrawnBand early on, patients often experience smoother prosthetic training, reduced fatigue, and a higher level of confidence from day one.
After an amputation, the residual limb often becomes overly sensitive. Even light touch, clothing, or air movement can cause discomfort or pain. This happens because the nerves in the residual limb are still active and searching for new ways to communicate with the brain.
Desensitization Therapy helps calm this sensitivity. It trains the skin and nerves to tolerate touch and pressure again. Doctors recommend it before prosthetic fitting so that the limb can comfortably handle the contact of the socket and daily use.
Without proper desensitization, even the best prosthesis may feel uncomfortable or cause skin irritation.
The idea is simple: gentle, repeated exposure to touch reduces the brain’s “alarm response.” Over time, what once felt unbearable starts to feel normal again.
It begins with soft, light textures—like a cotton ball or silk cloth—and slowly progresses to rougher materials such as a towel, sponge, or textured fabric. These daily exercises help retrain the nerves and prepare the skin for prosthetic contact.
Here’s a simple daily routine you can follow, always after consulting your doctor:
Always keep your skin clean and dry. If redness or irritation appears, stop and rest before continuing.
Desensitization works by reshaping how your brain processes touch signals. After amputation, the sensory map in your brain becomes confused. The brain expects signals from the lost limb but receives mixed input from the residual limb instead.
By gently reintroducing sensory feedback, you teach the brain to interpret new signals correctly. This helps reduce pain and hypersensitivity and improves overall comfort.
Desensitization is not just physical therapy—it’s emotional reassurance. Each session tells your body, “You’re safe. You’re healing.” That calm message reduces fear, improves tolerance, and builds trust between your mind and body.
Many patients find that these simple daily exercises become moments of mindfulness. They reconnect you with your body, one gentle touch at a time.
One of the main reasons doctors emphasize desensitization before fitting is to help your skin handle the prosthetic socket comfortably. The socket will apply gentle but constant pressure during wear. Without preparation, this can cause soreness or irritation.
With proper desensitization, your skin learns to adapt. It becomes stronger and less reactive, which means longer wear time and fewer fitting issues.
You don’t need expensive tools to start. Most items can be found at home:
For those with advanced setups, therapists may use special devices that deliver graded vibrations or air puffs for controlled stimulation.
A powerful approach is to combine desensitization with Mirror Therapy. While you visually train the brain using the mirror, you can gently touch or stimulate the residual limb at the same time.
This dual sensory training accelerates adaptation because both visual and tactile signals reach the brain together. It’s a holistic way to rebuild comfort, control, and confidence before the prosthetic fitting.
Improvement takes time—sometimes weeks or months. It’s important to keep a simple journal to track sensations, comfort levels, and any discomfort.
Write down when you start feeling more comfortable touching different textures or when pain episodes reduce. Sharing this information with your rehabilitation specialist helps them adjust your therapy plan effectively.
If desensitization causes sharp pain, severe redness, or swelling, stop immediately and consult your doctor. These symptoms might indicate over-stimulation or infection.
Never push through pain. The goal is calm adaptation, not discomfort. With proper guidance, desensitization should feel soothing and empowering—not stressful.
Families play a huge role during this therapy. Helping with setup, encouraging consistency, and celebrating progress all make a big difference.
For many amputees, it’s comforting to have a loved one assist gently, especially in the early stages. Their support helps reduce anxiety and promotes emotional healing.
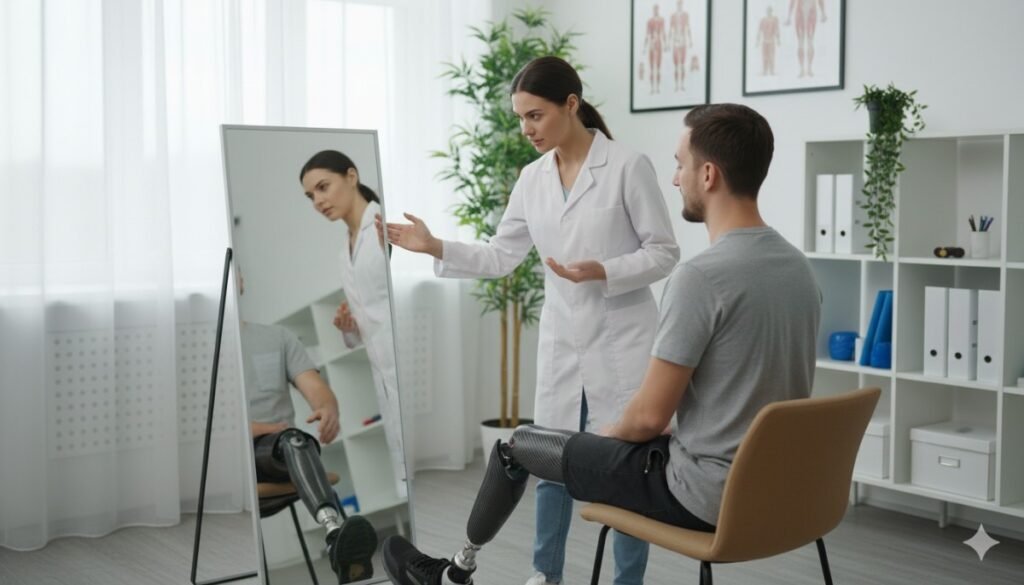
When doctors recommend pre-fit therapies, they rarely mean to choose just one. Mirror Therapy, EMS, and Desensitization are most effective when practiced together. Each targets a different aspect of recovery—brain, muscle, and skin—and together, they prepare the entire body for prosthetic adaptation.
Think of it like tuning an orchestra. Mirror Therapy trains the brain to conduct again, EMS strengthens the instruments, and Desensitization ensures everything feels comfortable when played together.
After limb loss, the brain, muscles, and nerves often lose their natural rhythm. Mirror Therapy restores mental coordination, EMS maintains muscle communication, and Desensitization softens the skin’s reactions.
When combined, these therapies rebuild a full feedback loop—your brain sends signals, muscles respond, and your skin provides calm, reliable feedback. This unity is what makes prosthetic control feel natural later on.
Every patient’s needs differ, but a typical pre-fit plan might include:
This steady rhythm keeps all systems engaged without overworking any part. Doctors may adjust the timing or duration based on healing and readiness.
Studies show that patients who follow a combined pre-fit program adapt to their prosthesis 30–50% faster than those who don’t. They also report fewer socket discomfort issues and reduced phantom pain.
The key isn’t intensity—it’s regularity. Small, daily steps build powerful habits and smoother transitions.
For users of the Grippy™ Bionic Hand, these therapies make a major difference. Myoelectric devices rely entirely on muscle signals. EMS primes those muscles, Mirror Therapy sharpens the brain’s response, and Desensitization ensures the socket contact feels natural.
Together, they create what doctors call a “receptive limb”—one that’s ready, responsive, and comfortable.
Doctors and prosthetists guide every step of this journey. Their role begins long before the prosthetic fitting. They assess healing, recommend safe start times for each therapy, and monitor progress closely.
They may also adjust medications, wound care routines, or physiotherapy schedules to match your comfort and progress.
Communication is essential. Share any new sensations, discomfort, or emotional concerns. Every bit of information helps tailor the plan to you.
As a patient, your biggest responsibility is consistency. These therapies only work when practiced regularly. Even on tough days, a few minutes of effort can make a difference.
Take notes about what feels better, what causes discomfort, and when improvements happen. These observations help your rehabilitation team fine-tune your plan.
Also, approach each session with patience. Recovery isn’t a race—it’s a steady rebuild of strength, trust, and confidence.
Every recovery journey is unique. Some people feel ready for prosthetic fitting within a few months, while others may take longer, depending on healing and overall health.
Doctors usually start pre-fit therapies once wounds have healed and swelling has reduced. For most patients, this happens within 4–8 weeks post-surgery. From there, a combination of therapies may continue for several months before fitting.
Your prosthetist helps ensure the limb socket fits properly and feels natural. They work closely with physiotherapists to make sure your muscles are responding as expected.
Together, they review muscle strength, skin tolerance, and signal clarity—all influenced by Mirror Therapy, EMS, and Desensitization.
Safety and comfort come first, always.
During the first two weeks, the focus is on mild Mirror Therapy and basic Desensitization. EMS may be introduced at a very low setting if approved by your doctor.
Mirror sessions should be short—just enough to trigger visual engagement without fatigue. Desensitization starts with the softest textures, building tolerance slowly.
Once comfort improves, EMS sessions can become more regular. You’ll begin to feel the muscles respond more clearly. Mirror Therapy can extend to 15–20 minutes, focusing on precise movements.
Desensitization now includes rougher materials and light tapping to build skin tolerance.
This is when the three therapies begin to harmonize. Mirror Therapy becomes smoother and more controlled, EMS strengthens contractions, and Desensitization exercises help the skin adapt to consistent touch.
You’ll likely notice reduced phantom sensations and a stronger sense of stability.
In these weeks, your doctor or prosthetist may begin early socket fitting or trial sessions. The work you’ve done will now show results—faster muscle response, improved comfort, and lower pain sensitivity.
You’ll also begin psychological preparation, learning to trust the prosthetic limb as an extension of yourself.
Recovery isn’t only physical—it’s deeply emotional. Losing a limb can affect confidence, identity, and self-esteem. That’s why pre-fit therapies often become emotional anchors too.
Mirror Therapy helps restore a sense of wholeness, EMS brings visible progress, and Desensitization rebuilds trust in your own body. Together, they replace fear with familiarity.
Many patients struggle with sensations that feel real but have no physical source. These experiences can be confusing, but they’re natural. Your brain is simply adjusting to a new reality.
Mirror Therapy and EMS both help calm these sensations by giving your brain reliable feedback again. Over time, the confusion fades and the body image stabilizes.
Every small improvement counts. Being able to touch your limb without pain, seeing stronger muscle contractions, or sleeping better through the night—all are signs of healing.
Celebrate these steps. They are proof that your body is learning and adapting. Keep track of progress in a small journal, and share it with your rehabilitation team.
Loved ones often play a bigger role than they realize. Their encouragement, patience, and belief in your progress can lift you during hard days.
Encourage open conversations. Share your challenges and victories. Healing becomes easier when you’re surrounded by understanding and positivity.
It’s normal to feel frustrated when progress feels slow. Some days the limb may feel more sensitive or the muscles weaker. Don’t be discouraged. Healing is not linear—it’s layered.
Taking a break, doing deep breathing, or speaking with your therapist can help. What matters is that you return to your routine when ready.
When you arrive for your first prosthetic fitting, the preparation you’ve done will make a clear difference. The limb will be calmer, the muscles more responsive, and your confidence higher.
The prosthetist will first check how the socket feels. Thanks to Desensitization, your skin will handle contact more easily. Mirror Therapy will help your brain accept the new limb’s presence, and EMS will make control more intuitive.
Once the prosthesis is fitted, you’ll start with simple tasks—gripping, lifting, rotating. These movements feel strange at first, but your body adapts quickly because it’s already been trained to respond to signals.
Patients who practiced EMS often find it easier to generate consistent muscle control, while Mirror Therapy users adjust faster to the visual presence of the new limb.
The first time you move a prosthetic hand—especially a bionic one—is unforgettable. It’s often emotional, powerful, and deeply motivating. Many users describe it as getting a part of themselves back.
That sense of connection comes from months of preparation, persistence, and patience. Every therapy session led you to that moment.

Even after you start using your prosthesis, Mirror Therapy, EMS, and Desensitization can continue in smaller doses. They keep your brain, muscles, and nerves balanced.
A few minutes a day helps maintain comfort, prevent muscle fatigue, and manage any recurring phantom sensations.
As you return to normal life—working, cooking, or exercising—you’ll discover that the pre-fit groundwork you did makes everything smoother. Your limb will tolerate longer wear times, and your prosthesis will feel more natural with each passing week.
Stay in touch with your prosthetist and rehabilitation team. They’ll check for socket alignment, muscle strength, and overall comfort. Regular follow-ups ensure your prosthesis keeps fitting well as your body changes.
Also, keep sharing feedback. Small adjustments early on prevent future discomfort.
Mirror Therapy, EMS, and Desensitization aren’t just treatments—they’re preparation. They give your body and mind a head start before the prosthesis arrives.
Every session strengthens connection, reduces fear, and builds readiness for independence.
Recovery is not something done to you—it’s something done with you. These therapies invite your brain, muscles, and nerves to work together again. The more you engage, the smoother the journey becomes.
At RoboBionics, we believe that advanced rehabilitation should be accessible to everyone. That’s why we build innovative, affordable prosthetic solutions like the Grippy™ Bionic Hand, designed and manufactured in India with world-class quality.
By combining such prosthetics with these doctor-prescribed pre-fit therapies, patients can experience not just function, but confidence and comfort.
Each step you take—each mirror session, EMS pulse, and touch exercise—brings you closer to regaining full independence. It’s a journey of patience, strength, and rediscovery.
The path may be slow, but it’s filled with victories. And with the right preparation, guidance, and technology, every person can reclaim control of their life.
If you or your loved one is preparing for a prosthetic fitting, take the first step today. Explore RoboBionics’ range of prosthetic solutions and schedule a free demo session to understand how our team can help you transition confidently into your new chapter.
Visit https://robobionics.in/bookdemo/ to book your session and begin your journey toward movement, comfort, and renewed independence.
For many clinicians, the surgery is only the first step. What happens after the operation

For trauma amputees, the journey does not begin at the prosthetic clinic. It begins much

Amputation after cancer is not just a surgical event. It is the end of one

When a child loses a limb, the challenge is never only physical. A child’s body