
Post-Op Follow-Up Schedule That Prevents Prosthetic Delays (For Clinicians)
For many clinicians, the surgery is only the first step. What happens after the operation


When someone loses a limb, the journey to recovery doesn’t end with surgery. In fact, it’s just the beginning. One of the most important—and often overlooked—steps before fitting a prosthetic socket is ensuring the wound has healed properly and the infection is fully under control.
Getting this step right makes all the difference. A well-healed, infection-free limb means the prosthetic fits better, feels more comfortable, and lasts longer. It also means fewer complications, faster rehabilitation, and a smoother return to daily life.
But when exactly is the right time to fit the socket? How does a medical professional know that the wound is ready? And what are the exact milestones or triggers that doctors should look for before giving the green light?
That’s what we’ll explore here. We’ll break down the medical, physical, and practical markers that guide the decision-making process—using clear, simple explanations that anyone can follow.
This article is written for clinicians, prosthetists, rehabilitation specialists, and even patients who want to understand what really goes into this critical phase of recovery. Let’s dive in.

After an amputation, the body enters a complex and delicate phase of healing. The wound site must close, tissues must rebuild, and the remaining limb (also called the residual limb or stump) needs to shape and strengthen itself to support the prosthetic socket later.
Every individual heals differently. Factors like age, nutrition, blood flow, diabetes, infection control, and overall health all influence the timeline. But generally, the healing process can be divided into a few predictable stages.
This is the body’s first response to surgery or trauma. It begins almost immediately after the amputation and usually lasts for a few days. During this time, the body sends white blood cells to fight infection and clear damaged tissue.
You may notice swelling, warmth, and redness around the site. A mild amount of drainage or fluid is also normal. However, if this phase lasts too long or the swelling becomes excessive, it could indicate an infection or poor blood flow that needs immediate medical attention.
In this stage, the body starts to rebuild. New tissue, blood vessels, and collagen form to close the wound. You’ll see granulation tissue—a pink, bumpy layer that signals healing is happening.
Proper wound care during this time is critical. Cleanliness, moisture balance, and protection from bacteria help ensure that new tissue grows strong and healthy.
This final phase can take several weeks to months. The wound strengthens, the scar forms, and the residual limb begins to take its shape. Swelling should gradually go down, and the skin should become more resilient.
Only after this phase can a medical professional start considering prosthetic fitting. But even then, certain milestones must be met.
Before thinking about fitting a socket, infection control is the number one priority. A prosthetic socket fits snugly around the skin. If there’s even a small infection, trapping that under the socket can worsen the condition, leading to severe pain, delayed healing, or even the need for revision surgery.
Even the most experienced clinicians can’t rely on appearance alone. Each case must be evaluated carefully. Some common signs include:
Sometimes, infections may hide beneath the surface. In those cases, blood tests, wound cultures, or imaging may be necessary.
Cleanliness might sound simple, but it’s one of the most powerful tools in infection control. The residual limb must be washed daily with mild soap and water, then dried completely. Bandages and dressings should be changed regularly using sterile materials.
Any moisture trapped between the wound and the dressing creates a breeding ground for bacteria. This is why keeping the area dry, ventilated, and clean makes a huge difference.
Doctors may prescribe antibiotics if there’s evidence of infection. But antibiotics alone aren’t enough. The wound must also be closely monitored to see whether it’s responding to treatment.
If redness or drainage continues despite medication, the medical team might need to explore deeper issues such as poor blood supply, retained sutures, or necrotic tissue that needs removal.
This careful, watchful approach prevents minor infections from becoming serious setbacks.
Every doctor and prosthetist looks for specific milestones before approving a patient for socket fitting. These milestones act as checkpoints—a way to confirm the limb is strong, healthy, and ready to handle the pressures of a prosthetic device.
Let’s look at these milestones one by one.
The first and most obvious milestone is full closure. There should be no open areas, scabs, or drainage. The skin must look healthy, pink (or appropriate to skin tone), and fully sealed.
If any part of the wound is still open, applying pressure from a socket could reopen it or trap bacteria, leading to infection.
Before giving the green light, doctors must ensure there are no signs of infection. Even a small pocket of pus or lingering redness can cause trouble later. Laboratory tests may confirm this, especially if healing has been slow or uncertain.
Swelling is a natural part of healing, but it must come down to a stable, consistent size before fitting. A shrinking or fluctuating limb shape makes it difficult to create a well-fitting socket.
Compression bandages, shrinker socks, or elastic wraps help reduce swelling and encourage shaping of the residual limb.
A simple test is to observe whether the limb circumference remains stable for at least a week. When it does, the shape is usually ready for casting or scanning.
The skin should be soft yet firm, not fragile or overly sensitive. A healthy scar should be flat and flexible, not raised, sunken, or tight.
If the scar sticks to underlying tissues or causes pulling, special therapies such as scar massage or silicone gel sheets may help before socket fitting.
After amputation, nerve endings can sometimes form neuromas—small, painful lumps that make wearing a prosthetic uncomfortable. Doctors must check for this.
The limb should have good sensation without sharp pain or tingling that worsens with light touch. Numbness, burning, or shooting pain may require additional treatment.
Muscles and joints around the residual limb must move freely. Stiffness, contractures, or limited range can prevent a proper socket fit and affect gait.
Physiotherapy plays a major role here. Stretching, strengthening, and positioning exercises should begin early—often before wound closure—to preserve mobility.
A prosthetic limb responds best to strong, coordinated muscles. Especially in myoelectric prosthetics like Grippy™, muscle signals from the residual limb control the movement of the device.
If muscles are weak or untrained, the prosthesis may not respond effectively. Rehabilitation teams should test and strengthen muscle groups before fitting begins.
Physical healing is just one part of the journey. Emotional readiness matters, too. Adjusting to limb loss can be difficult. Some individuals feel anxious or unsure about using a prosthetic.
Before moving ahead, doctors should ensure the patient feels mentally prepared, supported, and motivated. Psychological counseling and peer support can help immensely.

No single person decides when the socket can be fitted. It’s a team effort involving the surgeon, prosthetist, physiotherapist, and often the occupational therapist.
Each specialist brings unique insights:
This combined evaluation ensures the patient doesn’t rush into prosthetic fitting too soon, reducing the risk of complications later.
Regular communication between the medical team and patient is essential. Everyone should share updates, concerns, and observations.
Sometimes, a wound looks ready from the outside but still has issues beneath the surface. A transparent discussion prevents missteps.
The patient should also feel comfortable asking questions—about pain, care routines, or next steps. This collaboration builds confidence and trust.
Not every recovery follows a perfect timeline. Some wounds take longer to heal due to underlying factors. Understanding these delays helps doctors and patients manage expectations and take proactive steps.
Diabetic patients often experience slower wound healing due to reduced blood flow and nerve damage. Blood sugar control is critical. Even small spikes in glucose levels can delay tissue repair.
Frequent monitoring, balanced diet, and medications (if prescribed) all support better healing outcomes.
If blood flow to the limb is weak, oxygen and nutrients can’t reach the tissue effectively. Vascular assessments may be necessary before socket fitting.
In some cases, compression therapy, medication, or minor surgical interventions may help improve circulation.
If a patient had repeated infections, scar tissue may form unevenly. Extra care is needed to ensure the skin can tolerate socket pressure.
Sometimes, custom liners or adaptive materials are used to reduce friction and protect sensitive areas.
Healing requires protein, vitamins, and minerals. Poor nutrition can slow every stage of recovery.
Dietitians can help plan meals rich in nutrients like vitamin C, zinc, and iron—all crucial for tissue repair.
Stress and anxiety affect hormones that regulate healing. Patients who feel supported and motivated often recover faster.
Simple practices like guided relaxation, community support, and positive reinforcement make a big difference.
Even with modern prosthetics and technology, fitting too soon is a mistake. An early socket may seem like progress, but it can lead to setbacks if the wound isn’t ready.
Here are common red flags that suggest waiting longer:
Rushing the process can cause pressure sores, infection recurrence, or the need to refit the socket multiple times. It’s better to wait a few extra weeks than risk long-term discomfort or damage.
Once the basic hygiene and wound care steps are in place, the focus shifts toward advanced infection prevention and control. This stage is crucial, especially for patients who are at higher risk due to conditions like diabetes, vascular disease, or prolonged immobilization.
The goal isn’t just to heal the wound—it’s to build an environment where infection simply cannot take hold.
A wound that’s too dry can crack, while one that’s too wet can soften the surrounding skin and trap bacteria. Achieving the right moisture balance helps new cells grow and form strong, healthy tissue.
Doctors often recommend hydrocolloid or foam dressings that maintain a moist but not soggy environment. They keep bacteria out while letting oxygen in—a perfect combination for healing.
Sometimes, dead tissue (called necrotic tissue) blocks the wound from healing. Removing this tissue—a process known as debridement—gives healthy cells room to grow.
There are several gentle methods of debridement:
Doctors choose the method based on how the wound looks and how well the patient tolerates it. The key is to be gentle and precise, never aggressive.
Not every wound needs an antibiotic dressing, but in cases where there’s a risk of infection, silver- or iodine-based dressings can be helpful. These materials fight bacteria without harming new tissue.
However, using them for too long can slow healing, so doctors usually limit them to a short course and switch to regular dressings once the infection risk drops.
Oxygen is food for healing. Tissues need it to build new cells and fight bacteria. When blood flow is poor, oxygen levels drop and wounds take longer to close.
Hyperbaric oxygen therapy (HBOT) can be useful in selected cases. It increases oxygen in the blood, helping tissues repair faster. While it’s not for everyone, it has shown excellent results in chronic or complex wounds.
If a wound seems “stuck”—neither healing nor worsening—it’s time to dig deeper. Swabs or cultures help identify whether bacteria are present and what type they are. This information guides antibiotic selection and helps doctors treat precisely, not blindly.
Regular microbial checks prevent resistance and ensure that any infection is caught early before it spreads.

Modern medicine gives doctors and prosthetists several tools to track healing progress with accuracy and consistency. These technologies help determine whether a limb is ready for prosthetic fitting.
High-resolution imaging allows clinicians to document wound size, color, and texture over time. Comparing images week by week provides a clear view of improvement—or alerts the team when healing stalls.
This method also helps patients see their own progress, boosting confidence and motivation.
This test measures blood flow near the wound. Healthy, well-perfused tissue heals faster. If the reading shows reduced circulation, doctors may delay socket fitting and recommend therapy to improve blood supply first.
Infection often raises skin temperature around the wound. Thermal imaging can detect subtle differences before visual signs appear, giving doctors an early warning to intervene.
Devices that measure oxygen levels in the skin give a good idea of tissue health. Low readings may signal compromised healing capacity, guiding the medical team to hold off on socket fitting.
Once the wound is healed and swelling has reduced, prosthetists use 3D scanners to capture the exact shape of the residual limb.
These scans are extremely precise, allowing custom socket designs that fit comfortably and evenly distribute pressure. However, this step is only taken when the wound meets all healing milestones.
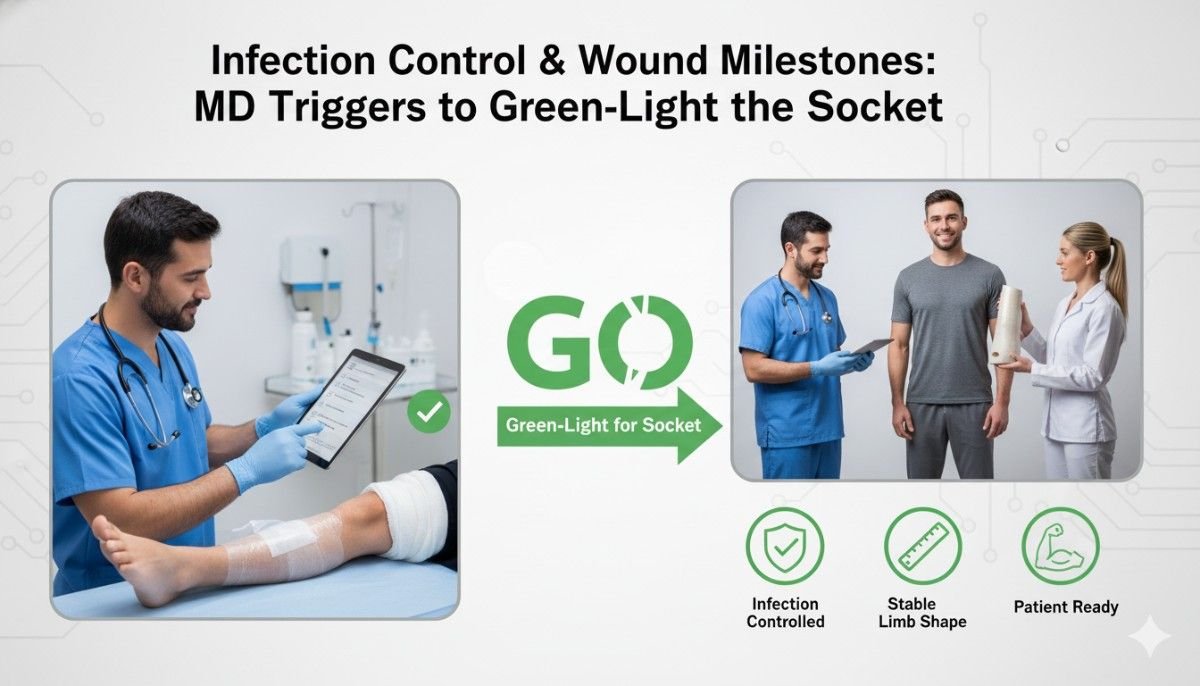
For doctors, giving the go-ahead for socket fitting isn’t a casual decision—it’s a moment of careful judgment. Every patient is unique, and what looks fine on the surface may still hide small risks beneath.
So, what exactly triggers a medical director (MD) or surgeon to say, “Yes, this limb is ready”? Let’s explore the key criteria.
Before anything else, the patient’s overall health must be stable. Blood pressure, sugar levels, and vital signs should all be within safe ranges. If the patient is still fighting an active infection elsewhere, socket fitting must wait.
The doctor examines the wound visually and by touch. The skin should feel firm, not boggy or fragile. The color should be even, without dark patches, yellow crusts, or shiny overstretched areas.
Palpation helps detect tenderness, fluid buildup, or hidden infection that isn’t visible.
The patient’s mobility and strength are tested. Can they move the residual limb freely? Is the range of motion sufficient to accommodate a prosthetic device?
Doctors work closely with physiotherapists to ensure the limb isn’t stiff or weak.
Pain is a strong indicator of readiness. Mild soreness is normal, but sharp or shooting pain under pressure suggests nerve issues or incomplete healing.
The MD must confirm that pain is manageable and doesn’t spike when the residual limb is touched or lightly compressed.
Before socket fitting, the skin must tolerate gentle pressure without blanching (turning white) or cracking. Some clinics perform a soft “load test” by applying mild pressure using a temporary liner to check if the skin responds well.
If redness fades quickly and no discomfort follows, that’s a positive sign.
Doctors also review the healing history: How long did it take to close? Were there any infections, debridements, or antibiotic courses? A stable, complication-free history strengthens the decision to move forward.
Finally, the doctor considers the patient’s mindset. Are they eager, cooperative, and aware of the next steps? Are they emotionally prepared for the physical adjustments that come with a prosthesis?
The MD’s approval is as much about physical readiness as it is about psychological preparedness.
Once the medical green light is given, the fitting process begins—but gradually. Jumping straight into a final socket can cause discomfort or setbacks.
Instead, prosthetists often start with a test socket or temporary socket.
A test socket is a clear or semi-transparent version of the final design, made from lightweight plastic. It allows the prosthetist to check pressure points, comfort, and alignment.
Patients wear it for short periods at first, allowing the team to make adjustments. Any redness, tightness, or pain helps guide refinements before moving to the final socket.
Choosing the right liner is key. Liners cushion the limb and prevent friction. Silicone, gel, and fabric liners all have unique properties.
For patients with sensitive skin or history of delayed healing, softer liners are ideal. They reduce pressure and improve comfort during the adjustment period.
Residual limbs can continue shrinking for months after healing. Regular measurements ensure that the socket still fits perfectly.
If volume changes significantly, the prosthetist may replace the liner or modify the socket interior to maintain the right fit.
Once stability is confirmed, the final socket is made using durable materials like carbon fiber or high-grade polymer.
Even after final fitting, regular follow-ups are essential to monitor skin condition and ensure comfort remains consistent.
The responsibility doesn’t end once the prosthesis is fitted. In fact, this is when infection risk can quietly return if hygiene and maintenance aren’t prioritized.
Patients should clean both the residual limb and the socket interior every day. A mild, fragrance-free soap and lukewarm water are sufficient. After cleaning, both should be dried thoroughly before wearing the prosthesis again.
Any trapped moisture, especially under warm conditions, can lead to bacterial or fungal growth.
Patients should inspect their skin daily using a mirror or camera if needed. Any redness, blisters, or rash must be reported immediately.
Early detection of irritation prevents bigger problems down the line.
Liners and socks should be washed daily and replaced when worn out. Even tiny particles of sweat and dirt can cause odor and skin irritation.
Wearing the prosthesis for long hours in the early weeks can strain healing skin. Doctors usually advise a gradual wear schedule—starting with short intervals and slowly increasing duration.
This approach helps the skin toughen naturally without overloading it.

Getting the doctor’s approval for a socket isn’t just a medical event—it’s deeply emotional. For many patients, it marks the first tangible step toward reclaiming independence.
Still, some may feel anxious or fearful: Will it hurt? Will I be able to use it well? What if it doesn’t fit right?
Here’s where empathy, reassurance, and communication matter most.
Doctors and prosthetists should take time to explain each step—how the socket works, what adjustments might be needed, and what sensations are normal.
When patients understand the process, they feel empowered rather than intimidated.
Meeting others who’ve walked the same path can make a world of difference. Peer mentors can share honest experiences, tips, and encouragement that clinical staff simply can’t provide from a personal perspective.
The first few days with a prosthetic are rarely perfect. It takes practice to build comfort, balance, and coordination. Letting patients know this upfront reduces frustration and helps them stay patient through the adjustment period.
Infection control isn’t just a pre-fitting concern—it defines the long-term success of prosthetic use. A limb that’s free from infection and fully healed provides a stable foundation for everything that follows.
Regular wound care, good hygiene habits, and follow-ups with the prosthetist and doctor ensure the limb stays healthy for years.
Every time the skin remains clean and intact, it adds another layer of comfort, confidence, and reliability to the user’s journey.
Think of each day as a small loop that keeps you safe. Start with a quick look at your limb in bright light. Use a mirror for hard-to-see spots. Wash with mild soap, rinse well, pat completely dry, and wait a minute before putting anything on. At night, clean again, let the skin breathe, and check for any tender point that lingers longer than a few minutes after doffing. This simple rhythm keeps trouble from sneaking up on you.
Skin gets stronger when it faces small, controlled stress and then rests. Ease into longer wear, not all at once. If a new task rubs in a new way, step back the next day and give the spot a break. A thin, even layer of moisturizer at bedtime helps the outer layer stay flexible, but let it soak in fully before sleep so the limb is dry by morning. Resilient skin is not hard skin; it’s healthy, pliable skin that recovers fast.
Warm weather brings more moisture under the liner. That moisture softens skin and invites bacteria. The fix is simple: clean more often, rotate a second liner so one can dry while the other works, and use breathable socks that wick. On very hot days, take brief “air breaks” at lunch and mid-afternoon. Dry the limb, wipe the liner, and re-don. These short pauses can prevent a week of irritation.
Your skin is built from what you eat and drink. Aim for steady protein at each meal, plenty of water, and colorful fruits and vegetables for vitamins and antioxidants. When you sweat more, drink more. If you have diabetes, track your glucose closely; stable numbers are the quiet engine behind trouble-free skin.
Even the best care sees the odd flare. When a red spot appears, act the same day. Remove the prosthesis, clean gently, and let the spot rest. If redness fades within an hour and pain is mild, resume with shorter wear the next day. If the redness holds its shape, if a blister forms, or if pain spikes with light touch, call your clinician. Early calls save weeks of delay.
A small open area is a stop sign for full wear. Treat it like a fresh wound: gentle cleaning, dry time, and a light dressing if advised. Do not “pad around it” with extra socks and hope for the best. Once the spot closes, give it two more calm days with limited wear. Your team will re-check pressure points, smooth edges inside the socket if needed, and confirm that the skin tolerates light load without lingering redness. Only then does the green light turn on again.
When infection shows up, the socket steps aside until the skin is quiet and clean. Your doctor will clear drainage, choose the right antibiotic if needed, and watch markers of inflammation. You return to short, test wear only after the wound looks healthy and feels normal to light pressure. The first week back is all about watchful minutes, not hours. If the skin passes this short test, time stretches again.
Life happens. A few kilos gained or lost can change how the socket hugs the limb. If the limb feels loose, you work harder, sweat more, and shift pressure to the wrong spots. If it feels tight, you trap blood and raise risk. Your prosthetist will re-measure, adjust liners or socks, or shape the socket interior. The re-certification step is simple: the limb must keep an even color and calm feel for the whole wear period and the thirty minutes after doffing. If it passes, you are good to go.
A revision resets the clock. Treat it as a new journey: closure first, infection control, swelling down, stable shape, and gentle load testing. The scar needs to glide, not stick. Scar massage and range-of-motion work begin early, with your team guiding pressure and timing. When the limb shows steady size for a full week and the skin tolerates a soft load without protest, the test socket phase begins again.
Sometimes the skin looks fine, but a sharp, electric twinge tells another story. That can be nerve irritation or a small neuroma. Your clinician will map the tender spot, adjust trim lines, and shift pressure away. If pain quiets with these steps, socket use continues. If pain stays sharp or wakes you at night, medical treatment comes first. Re-certification happens only when light tapping and gentle press no longer trigger the spark.

Take five minutes once a week to review three things: how long you wore the limb, how your skin looked right after doffing, and how it felt the next morning. Write one short line for each. Patterns appear fast on paper. If hours creep up and redness lingers, you know to scale back a little and call your team before small noise becomes big trouble.
Pain that is vague is hard to fix. A diary gives it shape. Note the time, the activity, the exact spot, and how long the feeling took to fade. Bring this to your visit. It lets your prosthetist adjust with purpose. Small changes to contour or liner often solve a big share of recurring hot spots once the pattern is clear.
A follow-up is more than “it’s fine” or “it hurts.” Arrive ready. Bring your diary, your liners, and the socks you actually use, not the ones you planned to use. Walk the way you walk at home, not the way you walk when you try to impress your clinician. Honest data leads to real fixes. Leave every visit with one tiny, clear action to try before the next one.
Confidence grows when you can solve small problems on your own. Learn to spot safe redness that fades and risky redness that holds. Learn how to wash and dry fast at work. Learn when to switch to a fresh liner. These are small skills, but they add up to big freedom. You own the process; your team backs you up.
Green light is not magic. It means the wound is closed, infection is quiet, swelling is steady, skin can handle gentle load, muscles are ready to work, and your mind is set for the road ahead. It also means you and your team have a plan for sweat, heat, small flares, and checks that keep you safe. With these pieces in place, the socket stops being a question and starts being a tool.
At Robobionics, we stay with you beyond the fit. We help you set your daily rhythm, teach simple self-checks, and fine-tune liners and trim lines as your limb settles. If you use our Grippy Bionic Hand, we guide your signal training so control feels natural and smooth. If you ever face a setback, we help you re-certify readiness the right way—calmly, step by step—so you return to full use without guesswork.
If you are close to the green light, or if you want a fresh review after a setback, book a demo and clinical check with our team. We will look at your skin, your socket, and your goals, and map a clear, simple path forward. Schedule at robobionics.in/bookdemo and let’s take the next step together, safely and with confidence.
For many clinicians, the surgery is only the first step. What happens after the operation

For trauma amputees, the journey does not begin at the prosthetic clinic. It begins much

Amputation after cancer is not just a surgical event. It is the end of one

When a child loses a limb, the challenge is never only physical. A child’s body